If you have one or more of these little ESP8266 WiFi modules, sooner or later you will want to update their firmware. Espressif, the module's maker has been regularly releasing firmware updates introducing new functionalities and bug fixes. So, let's give it a try!
In previous posts I demonstrated how to connect the ESP8266 to a computer and test it. You may want to check it out if you don't yet know how to do that. Check the shortcuts at the end of this post.
Which firmware?
You can choose between firmware's with OS or without OS (NONOS). A firmware with OS will make your module a bootable device able to work by its own. You can even develop and upload a customized firmware. There are firmware's from different sources spread across the Internet, some quite suspicious. I recommend to go with a "trusted" source like AI-Thinker or Espressif. For this guide I will be using firmware from Espressif, the maker of the modules.
I am using a 4Mbit module and, at the time of writing, the latest firmware from Espressif that
will "fit" this memory size is esp8266_nonos_sdk_v1.4.0_15_09_18_0. If your module has 8Mbit flash or more, you can update to a newer version. You can download ESP8266 firmware from Espressif here.
What firmware flasher tool?
To upload the firmware to the ESP8266 we can use several programs. I will be using the free ESP FLASH TOOL from Espressif, the maker of the modules. The latest version is 2.4, you can get it here.
Firmware download mode
Before the firmware can be uploaded, the ESP8266 module must be in firmware download mode. This is done by connecting GPIOØ pin to ground (GND).
Get ESP8266 module info
Once the module is in download mode, powered up and connected to a computer:
- Check the correct COM port is selected in ESP FLASH TOOL. The default Baud rate should work. In case it doesn't try different values.
- Click the START button.
The program should display SYNC in a green square left of the start button. It will retrieve the MAC address, memory size and crystal frequency, among other info. .
Select and upload firmware files
Now that we know the ESP flash download tool is communicating with our module:
- Select the correct flash memory size and crystal frequency. Note: sometimes the program retrieves a wrong crystal frequency (24Mhz or 21Mhz for example).
Now, depending on the firmware we want to use, we need to select one or more files in the ESP Flash Download Tool Download Path Config panel. Each of these files must be loaded to the correct memory address. This information should be in a Readme file in the firmware archive file.
- For each file needed, click the ... button of the correct memory address and navigate to the .bin file.
- Check the selection box of each file/memory address.
- Press START.
After a few seconds, if the upload was successful, the ESP Flash Download Tool will display FINISH.
Now that we successfully updated the firmware we must not forget to disable the firmware download mode by disconnecting the GPIOØ pin from ground!
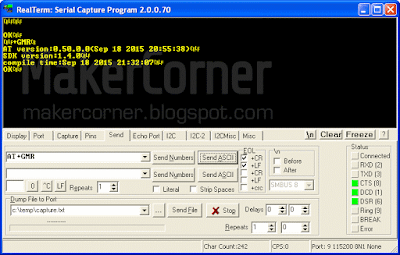
In RealTerm, sending the AT+GMR command will show the new firmware info:
Be aware that the firmware upgrade might change the ESP8266 baud rate. In this case you must change the baud rate in RealTerm also!
I have uploaded a ESP8266 firmware upgrade video tutorial to YouTube. Please check it out and give it a thumbs up if you like it!
Downloads:
Download ESP FLASH DOWNLOAD TOOL
Download ESP8266 firmware
Download RealTerm
Buy the Parts:
Buy the ESP8266 Wi-Fi from Banggood
Buy the ESP8266 Wi-Fi from Dealextreme
Buy the USB to Serial Adapter from Banggood
Buy the USB to Serial Adapter from Dealextreme
Previous ESP8266 posts:
ESP8266 ESP-01 testing - Part 2
ESP8266 ESP-01 testing - Part 1
ESP8266 WiFi modules


No comments:
Post a Comment