Showing posts with label module. Show all posts

Friday, May 26, 2017

HC-05 Bluetooth module AT commands tutorial

Today we are going to learn how to read and change the programmed settings and information stored on the popular HC-05 Bluetooth module. In this tutorial we will learn how to check what firmware version is installed, change the device name, baud rate, etc. 

In part one we learned how to add two-way Bluetooth communication to the Arduino. If you missed it, please check it out here. 

Like similar devices, the HC-05 modules physically interface with other devices using a serial interface and AT commands. In fact, reading or changing the HC-05’s settings is very similar to reading and changing the settings of the ESP8266 Wi-Fi module, which I demonstrated on a previous post.


To access the HC-05 serial interface we use a USB to serial adapter. The connection is very simple, the transmit pin of the HC-05 connects to the receive pin of the USB to serial adapter and vice-versa and the GND (ground) and VCC pins connect to its counterparts. However we must be careful and use the same logic level used by the HC-05 module. Bare HC-05 modules (without breakout board) accept only 1.8 to 3.3V levels. Most (if not all) HC-05 modules with breakout boards also use 3.3V logic level, so a level adapter may be needed between the USB to Serial adapter TX pin and the HC-05 RXD pin if your USB to Serial adapter is only capable of using 5V logic levels. 
5V 3V Logic level adapter
If you don’t have a logic level adapter you can use a simple two resistor voltage divider, like we did in part 1 of the HC-05 tutorial. The HC-05 power supply voltage (VCC) must also be respected. If you use the wrong voltage, operation can be unreliable or the module destroyed!  


Step 1 - Connections
USB To Serial Adapter    HC-05 module
VCC ---------------------------> VCC
TX -----------------------------> RXD *
RX -----------------------------> TXD
GND ---------------------------> GND

* Voltage level must match! Use level converter or voltage divider.

Once the HC-05 is wired to the USB to Serial adapter, plug it in your computer.

Step 2 – Enter HC-05 command state
HC-05 Bluetooth modules can work in (normal) data state or in command state. Once powered, the HC-05 module led should start blinking. If the led blinks approximately every two seconds, it means the HC-05 module is in command state, ready to accept AT commands, which is what we want. If the led blinks very fast it means the HC-05 module is in data state, which we don’t want. 

HC-05 modules with a button seem to default to data state when powered, while modules without a button are wired to enter into command state when powered. Behaviour is not the same for all HC-05 modules!

Entering command state:
Disconnect VCC from the HC-05 module. Press the small button and, while pressing the button, reconnect VCC to the HC-05. After a few moments the led will start to blink at a slow rate. Stop pressing the button. The module is now in command state. If your HC-05 Bluetooth module doesn’t have a button you can enable command mode by applying 3.3V to the HC-05 KEY pin.

To communicate with the HC-05 module via the serial interface we use a serial communications (terminal) program. I will demonstrate using RealTerm. You can download RealTerm here.

Before we can start typing commands we must configure the port and baud rate in RealTerm.You can see what port is being used by your USB to Serial adapter in Windows Device Manager. Select the correct port. Most HC-05 modules appear to use a default baud rate of 38400. Select 38400. Then press the Change button.

The HC-05 serial interface requires a CR (carriage return) and a LF (line feed) at the end of every command. Set your serial terminal program to automatically send a CR+LF.

AT commands
Please note that HC-05 Bluetooth modules come with different firmware versions installed. This means that your module may use a slightly different syntax for some AT commands or it may have fewer or more AT commands than other modules. At the end of this tutorial I give some advice on how to get the AT commands list for your HC-05 Bluetooth module. 
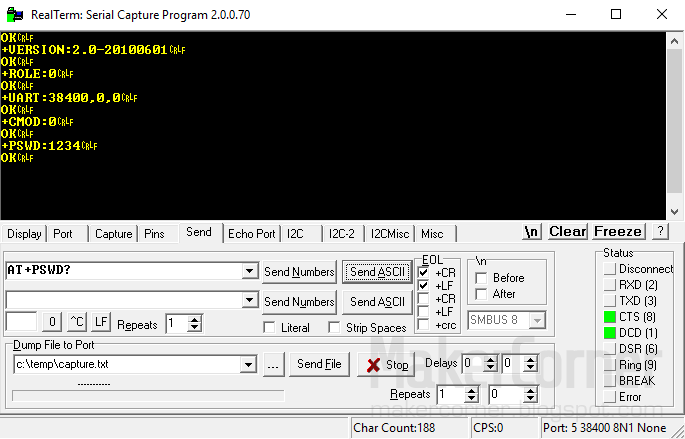
HC-05 Bluetooth AT commands testing

Test the serial interface
Type “AT” and press Send. The HC-05 should respond with OK if the command is accepted. If garbled text is displayed, this means the baud rate setting in RealTerm is wrong. Change the baud rate and try again until OK is displayed.

Check firmware version
To know what firmware is installed on the device, type “AT+VERSION?”

Check serial parameters (baud rate)
To know what baud rate is being used by your HC-05 module, type “AT+UART?”. The module will return three parameters (Baud rate, Stop bit, Parity).

Set serial parameters (baud rate)
To change the baud rate, type “AT+UART=<param1>, <param2>,<param3>”. Params are Baud rate, stop bit and parity.

Restore default parameters
To restore the HC-05 to factory default settings type “AT+ORGL”.

Bluetooth Masters and Slaves
Connected Bluetooth devices form networks that are commonly referred to as piconets. And Bluetooth uses a master/slave model to control when and where devices can send data. A single master device can be connected to up to seven slave devices, but a slave device (in the same piconet) can only be connected to a single master. 

The master device coordinates the communication throughout the piconet. It can send data to its slaves and request data from them. Slave devices are only allowed to transmit to and receive from their master. They can’t “talk” to other slaves in the piconet.

Master or Slave?
To know if the module is set as “Master” or “Slave”, type AT+ROLE?
The HC-05 will return 1 for Master or 0 for Slave.

Set HC-05 as “Master”
To set the HC-05 as “Master”, type “AT+ROLE=1”.

Set HC-05 as “Slave”
To set the HC-05 as “Slave”, type “AT+ROLE=0”.

Check connect mode
To check what connect mode is enabled type “AT+CMODE?”
The HC-05 will return: 0 (predefined address), 1 (any address) or 2 (slave loop).

Set connect mode
To set connect mode, type “AT+CMODE=<param>”. Where “<param>” can be 0 (fixed address), 1 (any address in range) or 2 (slave-loop).

Get working sate
To get the working state, for example, to know if the Bluetooth module is paired or not, type “AT+STATE?”. The HC-05 will return: “INITIALIZED”, “READY”, “PAIRABLE”, “PAIRED”, “INQUIRING”, “CONNECTING”, ”CONNECTED”, “DISCONNECTED” or “NUKNOW”. 

Get pin code
To pair Bluetooth devices a pin code is requested for the authentication process. All HC-05 modules seem to come with a “1234” default pin code. But, if the default code was altered it can be read by typing “AT+PSWD?”.

Set pin code
To change the pin code type “AT+PSWD=<newpincode>”, where “<newpincode>” is the pin code to be set.

Check HC-05 module name
To know what name the module is using, type “AT+NAME?” while the module button is pressed.

Set the HC-05 module name
To set the module name type “AT+NAME=<newname>”, where “<newname>” is the new name to be used by the HC-05.

To get your module’s complete list of HC-05 AT commands and specs, go to the manufacturer website. If you don’t know the manufacturers name try searching by the string returned by the “AT+VERSION?” command. The module used in this tutorial returned “H-C-2010-06-01” which pointed to ITeadStudio.com where I got the HC-05 AT commands list.

Buy the parts
Buy the HC-05 Bluetooth module from Banggood
Buy the USB to Serial Adapter from Banggood
Buy the HC-05 Bluetooth module from Dealextreme
Buy the USB to Serial Adapter from Dealextreme
Buy the Logic Level Converter from Banggood
Buy the Logic Level Converter from Dealextreme

I may get a small fee if you use the links to buy the parts. Thank you for your support!
 
Documentation
HC-05 Bluetooth Specs and AT commands list

PART 1: Arduino Two-Way Bluetooth with HC-05 module

Friday, May 12, 2017

Arduino Two-Way Bluetooth with HC-05 module

Today we are going to learn how to establish two-way Bluetooth communications between an Arduino board and a PC. We will learn how to send data from the PC to the Arduino and from the Arduino to the PC using Bluetooth. In this step-by-step tutorial you will learn the basics of Bluetooth communications using the cheap and widely available HC-05 Wireless Bluetooth RF Transceiver Module.

HC-05 Bluetooth modules
The HC-05 is a Bluetooth V2.0+EDR (Enhanced Data Rate) SPP (Serial Port Protocol) module with 2.4GHz radio transceiver and baseband, designed for transparent wireless serial connection setup. It uses the CSR Bluecore 4-External single chip Bluetooth (BCR417) system with CMOS technology and AFH (Adaptive Frequency Hopping). It has a footprint as small as 12.7mmx27mm (without breakout board).

HC-05 Bluetooth modules (bare and w/ breakout board)

We must pay attention when buying these modules because there are several “flavors” of HC-05 Bluetooth modules. These modules cost about 5 USD and are available with or without a breakout board. The breakout board is a small “motherboard” where the Bluetooth module is soldered. Modules with a breakout board have a pin header, a led and sometimes also a button. Most HC-05 modules with breakout boards have also a voltage converter and can be powered from the Arduino 5V pin.

I recommend getting a version of HC-05 with a breakout board, because it’s much easier to work with when you are experimenting or testing. The most popular HC-05 modules appear to be the FC-114 and the ZS-40.

HC-05 Bluetooth module specs:
Bluetooth V2.0+EDR.
Typical -80dBm sensitivity.
Up to +4dBm RF transmit power.
Integrated antenna.
I/O: 1.8 to 3.6V.
PIO control.
UART interface with programmable baud rate.
Supported baud rates: 9600,19200,38400,57600,115200,230400,460800.
Auto-connect to the last device on power on as default.
Permits pairing device to connect as default.
Auto-reconnect in 30 min when disconnected as a result of beyond the range of connection.
Full HC-05 specs are available here.

5V<>3.3V level converter/shifterAll HC-05 modules seem to be using 3.3V logic level. Since most Arduino boards use 5V logic level, we need to use a logic level converter between the Arduino and the HC-05 module RX pin to convert 5V to 3.3V. We can use a level converter board or a simple 2 resistor voltage divider. In this tutorial I will use a 2 resistor voltage divider. There is no need to use a converter for the HC-05 TX pin because the Arduino works OK with the HC-05 3.3V logic.

Parts
Arduino UNO (others can be used)
HC-05 Wireless Bluetooth RF Transceiver Module
1x10K resistor
1x 22K (or 20K) resistor
Breadboard + Jumper wires

Step 1 – Connect the modules according to the circuit. 

Arduino + HC-05 Bluetooth circuit

Pay special attention to the supply voltage used by your module. If your HC-05 module uses 3.3V supply voltage you must connect it to the 3.3V pin on the Arduino, never the 5V. If you use excessive voltage you can destroy the module! 

The voltage divider is made with one 10K resistor and one 22K resistor, but you can use other values as long R2 is about 1/3 the sum of R1+R2. 

The HC-05 EN and STATE pins are not needed for this tutorial and are not connected. 

Step 2 – Power the Arduino board 
Apply power to the Arduino board by connecting to an USB connector on your PC or by connecting a power supply to the Arduino board DC input. The HC-05 module led should blink at a fast rate, signalling it is in data mode.

Step 3 – Pair the HC-05 Bluetooth module
Once the Bluetooth module is powered, it should be visible by other Bluetooth enabled devices like a cell phone, tablet or PC. For this tutorial we need the Bluetooth module to be detected by the PC, so your must enable or install a Bluetooth device (like a USB dongle). When Bluetooth is enabled the Bluetooth icon is shown in the O.S. system tray area. Click on it and select Add Devices. Your bluetooth module should be listed , usually as “HC-05”, click on it and then click Next. You will be prompted to enter the pairing code/password. The default code for most Bluetooth devices is either 1234 or 0000. Click Next. If the pairing is successful, you will see a confirmation message.

Remember that Bluetooth class 2 devices have a maximum range of about 30 ft (10m), but often reliable communication can only be made at distances shorter than 9 ft (3 m).

Step 4 – Upload the sketch file 
After the HC-05 module is paired, disable it by disconnecting from the power supply pin, otherwise you may not be able to upload the sketch. The project includes two files send_test and receive_test that can be downloaded from here. Open the send_test sketch on the Arduino IDE and upload it to the Arduino board. Once the upload is finished, reconnect power to the HC-05 Bluetooth module. 

Step 5 – Check if the Bluetooth module is transmitting 
The code on the send_test sketch will repeatedly send a text message via Bluetooth. Open a terminal program like RealTerm and check that this message is being received. Don’t forget to set the correct port and baud rate. The default baud rate for the HC-05 module is 38400. If you see garbled characters instead of text, you are most probably using the wrong baud rate. The ports being used can be seen on your PC’s device manager. RealTerm can be downloaded here.

HC-05 Bluetooth module send test with RealTerm

Step 6 – Check the Bluetooth module is receiving 
Disconnect power to the Bluetooth module. Open the receive_test sketch on the Arduino IDE and upload it to the Arduino board. This code will make the led on the Arduino board turn ON or OFF when you send 1 or 0 from the terminal program. Once the upload is finished, reconnect power to the HC-05 Bluetooth module.

HC-05 Bluetooth module receive test with RealTerm

Press the Send tab in RealTerm, type 1 and press the Send as text button. The led on the Arduino board should turn ON. Now type 0 and press the Send as text button. The led on the Arduino board should turn OFF. 

That’s it for now! We successfully tested bi-directional Bluetooth communication between the Arduino and a PC. Next time we will learn how to read and change default HC-05 Bluetooth module settings. 

Buy the parts
Buy the Arduino UNO from Banggood
Buy the HC-05 Bluetooth module from Banggood
Buy resistors from Banggood
Buy the Arduino UNO from Dealextreme
Buy the HC-05 Bluetooth module from Dealextreme
Buy resistors from Dealextreme

I may get a small fee if you use the links to buy the parts. Thank you for your support!

Friday, April 28, 2017

Controlling relays with the Arduino

Today we are learning how to control relays with a microcontroller, using an Arduino. In this easy project we will program an Arduino board to switch On or Off any device you want, for example, an electrical appliance like a lamp, a heater or a fan. This is a simple but useful project, perfect if you are new to Arduino. Some knowledge of electronics and programming is a plus, but anyone can succeed in the Arduino world. So, what's an Arduino?

The Arduino platform
Arduino is an open-source electronics platform based on cheap but powerful and easy-to-use hardware and software. Arduino designs and manufactures microcontroller kits distributed as open-source hardware and software, permitting the manufacture of Arduino boards and distribution of the software by anyone. Being an easy tool for learning and fast prototyping, Arduino quickly gained success and has been used in thousands of different projects and applications by both beginners and advanced users.

To program the boards the Arduino project provides an IDE (integrated development environment), which includes a code editor, compiler and debugger. Arduino uses a custom programming language that is very similar to C and C++.

Arduino boards
There are several Arduino boards available, using mainly ATMEL and ARM processors. They vary in processing power, capabilities and  size. Usually Arduino boards are used together with other electronic devices like sensors, switches, displays, etc. These are manufactured in such a way as to easily connect with the Arduino boards. Many expansion shields are also available.

Arduino UNO, MEGA 2560, Nano and Lilypad
Popular Arduino boards (UNO, Nano, Mega 2560 and Lilypad).

Arduino relay control project
This project consists on controlling a relay with an Arduino board and a button switch. Once the board is programmed, pressing the button switch will turn the relay to the On or Off state, switching on or off whatever device is controlled by the relay. I will be using an Arduino UNO, but other Arduino boards (Nano, Leonardo, MEGA, etc) can be used.

Arduino relay control interconnects

Relay, button and resistor
Hardware parts:
1x Arduino UNO board
1x Relay module (5V)
1x tactile button switch
1x 10KOhm resistor
Breadboard
Breadboard jumper wires

Notes:
This project uses a relay module that can be directly interfaced by an Arduino board. The relay used is not critical but it must be capable of handling the power that the appliance draws. In this tutorial a 10A relay module is used which can handle up-to 2400W (240Vx10A resistive loads) appliances. Relay coil is 5 Volts. This relay module has an led that lights up when the relay is switched on. Info on where you can buy the relay module is at the end of this post.

A breadboard makes hooking up the circuit easier, but is not essential.

How does it work?
Pressing the button switch momentarily will put pin 2 of the Arduino in HIGH (ON) state, with 5 Volts. This voltage will put the transistor in the relay module in the ON (conducting) state and that will then power the relay. When the relay is powered, the relay contacts will close and let mains power flow to our appliance. The opposite happens when the button is pressed again, pin 2 is put in LOW (OFF) state with 0 Volts and the relay is switched OFF. The controlled appliance is connected to two of the three terminal blue connector (the one with screws) on the relay module. 

Relay circuit


Step 1 - Download and install the Arduino IDE
There are two versions of the IDE, the offline one and the Arduino Web Editor. The traditional offline IDE will let you work without Internet connection. The Arduino Web Editor saves your work in the cloud and requires an Internet connection. In this tutorial I will be using the offline IDE. It can be downloaded here.  

Step 2 - Connect the circuit according to the schematic.
The circuit is really simple and all pins are labelled, both on the Arduino board and the relay module. It can all be put together using a small breadboard and some breadboard jump wires. The relay has 3 pins labelled -, + and S. Pin S is connected to an output pin on the Arduino, pin 2. The button switch has 4 pins, but 2 pairs are connected together! Check with a multimeter or, if the switch has no effect after the code is uploaded, try connecting to the other pins by rotating the switch 90º.

Step 3 - Connect the board to your computer.
Arduino boards use USB connection. If you are buying an Arduino board don't forget the correct USB cable. The Arduino UNO uses USB A to B cable (standard USB printer cable) and the Arduino Nano uses mini B USB plug.

Step 4 - Start the Arduino IDE
When the IDE is stated it will automatically create and name a file called a sketch. Sketch files is where we enter our code. Ignore the blank sketch file and download the project sketch file here. Then open the file in the IDE.

Step 5 - Select the board
Before uploading the sketch to the board we must make sure the correct type of board is selected in the IDE. Go to Tools > Board and select the correct board matching the board you are using.

Step 6 - Select the Port
Before uploading the sketch to the board select the correct communications port for the board. In the Tools menu, in Board, select the correct COM port.

Step 7- Upload the code
To upload the code to the Arduino board go to File and select Upload, or press the Upload button on the IDE toolbar. In a few seconds the code will be compiled and then uploaded to the board.

Arduino IDE

Testing
Once the code upload is completed you can test the circuit by pressing the switch button. You should hear the relay click on and off as you press the button.  If you use the suggested relay module, an led will also light up when the relay is switched on. If the switch has no effect, check the connections for errors or bad contacts and try rotating the tactile switch by 90º.

That's it! You now know how to use and program an Arduino to switch relays. You can use this project as it is or you can make changes to the code, like adding more relays or switching the relay On or Off at predetermined programmed times. Have fun!

Buy the parts and support MakerCorner!
I may get a small fee if you use the following links to buy the parts. Thank you for your support!


Friday, December 9, 2016

Wi-Fi Internet Connected ThingSpeak.com Temperature Logger with ESP8266 + DS18B20 + NODEMCU

Today we are going make a remote Wi-Fi Internet connected temperature data logger using an ESP8266 WiFi module and a DS18B20 temperature sensor. The temperature readings will be automatically published at ThingSpeak.com and can be accessed from anywhere on Earth with Internet access. This is an easy and inexpensive project that almost anyone can successfully accomplish!

Hardware needed:
ESP8266 ESP-01 module (other ESP8266 modules can also be used).
DS18B20 temperature sensor.
1 4.7K 1/8w resistor.
Breadboard.
Breadboard wires.
Power supply (3.0 - 3.6 Volt).

The DS18B20 temperature sensor uses the 1-Wire bus that (as the name implies) requires only one data line for communication with a micro-controller. As you may recall from previous posts, the ESP8266 ESP-01 has 2 GPIO (General purpose In/Out ) ports and can be programmed to be used as a stand-alone device. So, to build a Wi-Fi one sensor temperature logger all we need is a ESP8266 module, a temperature sensor, one resistor and a power source. If we needed added functionality, for example also displaying the temperature reading in an LCD, then we would not use a stand-alone ESP8266, but we would connect it to an microcontroller board (like an Arduino). More advanced users could easily build a bare bones board with a microcontroller and a few discrete components.

ESP8266 + DS18B20 Temperature Logger
ESP8266 + DS18B20 Temperature Logger breadboard

DS18B20 pin assignment
The breadboard is not essential, just convenient for testing purposes. After all testing is done we would solder all the components together for minimum footprint.
  
For power source we have many options. We will choose a suitable power source based on where the sensor and module will be located and the autonomy needed. For testing purposes we can use a USB 5V to 3.3V voltage converter or two 1.5V fresh batteries in series. As long as it can deliver between 3V and 3.6V and 170mA, it will do.
 
The DS18B20 can be powered in two ways: external supply or parasite supply. Parasite power supply mode can be very useful if the sensor will be located far away from the Wi-Fi module. In parasite power mode the sensor gets its power from the sensor data line. There are caveats however, so read the DS18B20 datasheet carefully. In this circuit I will be using use a "normal" external power supply.


For the ESP8266 to work as a stand-alone device we need to use a module with bootable OS. For this project we will use the NodeMCU firmware, based in the eLua programming language. NodeMCU firmware can be obtained from GitHub. You can buy a ESP8266 module with NodeMCU already loaded or you can flash a "standard" ESP8266 with the NodeMCU firmware yourself. If you're like me you'll want to flash the firmware yourself. After all that's how we learn, by doing it ourselves!

If you don't know how to upload NodeMCU firmware to the ESP8266, please read my previous post.

After successfully flashing the ESP8266 with NodeMCU we will need to upload three additional files to the module: sensor.lua, ds18b20.lua and init.lua. Reading of sensor data is done by sensor.lua and ds18b20.lua.

To publish the temperature sensor data on ThingSpeak.com you must first create an account with ThingSpeak and get an API key. After you create your account, click on the API keys tab to get them.

ThingSpeak API key

Copy the API write key and edit sensor.lua to add the key. Temperature reading interval set in sensor.lua and take place once a minute, but this can be changed. Init.lua should be the last file uploaded and, before you upload it, you must edit the file to add your Wi-Fi login information.


To upload the .lua files we can use ESPlorer or LuaLoader programs. In this example I'm using ESPlorer:

Uploading Lua files to ESP8266 NODEMCU with ESPlorer

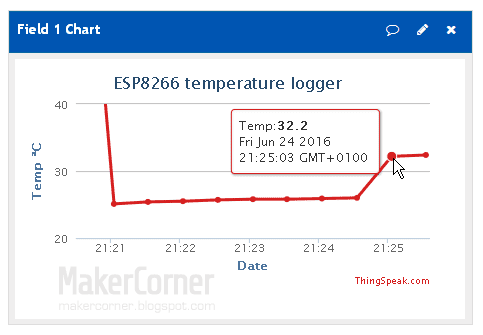
If all is OK, after the files are uploaded temperature readings will start and will be published on your ThingSpeak.com channel:

ThingSpeak temperature logger chart data
Congratulations! You now have an Internet connected temperature data logger!

Downloads:
DS18B20 datasheet
ESPlorer program
Lua files (sensor.lua, ds18b20.lua, init.lua)

Buy the parts and support MakerCorner!
I buy most of my electronics, tools and measuring equipment from Dealextreme and Banggood in China. They have low prices, friendly and helpful staff and will offer a solution if something goes wrong with your order. They have warehouses in Europe and the USA and can provide faster delivery for many of the items. I get a small fee if you buy from them through links in MakerCorner. So, please support my work by clicking on the following links. Thank you!

All parts are available in DX and Banggood, just click on the links and search for the part name on the web site.

Buy the parts from Dealextreme
Buy the parts from Banggood

Previous ESP8266 posts: 
ESP8266 NodeMCU firmware update
ESP8266 firmware update
ESP8266 ESP-01 testing - Part 2
ESP8266 ESP-01 testing - Part 1
ESP8266 WiFi modules


Saturday, June 25, 2016

ESP8266 NodeMCU firmware update

As we know from previous posts, the ESP8266 WiFi module can work as a standalone device. It's MCU, GPIO ports and user memory are all it's needed to make simple IoT projects like wireless Internet enabled data loggers.

For the ESP8266 to work as a standalone device we need to use a module with bootable OS. For this project we will use the NodeMCU firmware. NodeMCU is a firmware based in the eLua programming language for the ESP8266 from Espressif. The latest firmware is based on the Espressif NON-OS SDK 1.5.1.

You can buy a ESP8266 module with NodeMCU already loaded or you can flash a "standard" ESP8266 with the NodeMCU firmware yourself. If you're like me you'll want to flash the firmware yourself. After all that's how we learn stuff, by doing it ourselves!

NodeMCU firmware can be obtained from GitHub. It currently is made up of 41 modules. According to the team, due to the ever-growing number of modules available within NodeMCU, pre-built binaries are no longer made available. Now you select the modules you need, provide an e-mail address and the firmware will be custom built and sent to your e-mail. But older pre-built NodeMCU firmware versions are available. You can also built your own NodeMCU firmware. Fore more info go to the NodeMCU firmware GitHub project page.

To replace the ESP8266 firmware with NodeMCU we can use one of several flasher tools available. I will use the official tool from Espressif: ESP Flash Download Tool. 

Put the ESP8266 module in download mode and download the NodeMCU .bin firmware file to the 0x00000 address. You will need an USB to Serial adapter. If you don't know how to do this, read my previous post.


NODEMCU firmware flashing with ESP Flash download tool

After the the firmware is successfully uploaded to the module we can check if the device is booting with NodeMCU. Disable download mode, start RealTerm and restart the module. In RealTerm you shoud get a Lua prompt:

RealTerm - NodeMCU firmware update success

Ignore the cannot open init.lua message, it's normal. It's shown because we did not upload a init.lua file yet. We'll do that when we upload Lua project files.

Downloads:
Download ESP FLASH DOWNLOAD TOOL
Download ESP8266 NodeMCU firmware
Download RealTerm

Buy the Parts:
Buy the ESP8266 Wi-Fi from Banggood
Buy the ESP8266 Wi-Fi from Dealextreme
Buy the USB to Serial Adapter from Banggood
Buy the USB to Serial Adapter from Dealextreme

Previous ESP8266 posts: 
ESP8266 firmware update
ESP8266 ESP-01 testing - Part 2
ESP8266 ESP-01 testing - Part 1
ESP8266 WiFi modules

Thursday, June 16, 2016

ESP8266 firmware update

If you have one or more of these little ESP8266 WiFi modules, sooner or later you will want to update their firmware. Espressif, the module's maker has been regularly releasing firmware updates introducing new functionalities and bug fixes. So, let's give it a try!

In previous posts I demonstrated how to connect the ESP8266 to a computer and test it. You may want to check it out if you don't yet know how to do that. Check the shortcuts at the end of this post.


Which firmware?


You can choose between firmware's with OS or without OS (NONOS). A firmware with OS will make your module a bootable device able to work by its own. You can even develop and upload a customized firmware. There are firmware's from different sources spread across the Internet, some quite suspicious. I recommend to go with a "trusted" source like AI-Thinker or Espressif. For this guide I will be using firmware from Espressif, the maker of the modules.

I am using a 4Mbit module and, at the time of writing, the latest firmware from Espressif that will "fit" this memory size is esp8266_nonos_sdk_v1.4.0_15_09_18_0. If your module has 8Mbit flash or more, you can update to a newer version. You can download ESP8266 firmware from Espressif here.


What firmware flasher tool?


To upload the firmware to the ESP8266 we can use several programs. I will be using the free ESP FLASH TOOL from Espressif, the maker of the modules. The latest version is 2.4, you can get it here.

ESP FLASH DOWNLOAD TOOL V2.4


Firmware download mode


Before the firmware can be uploaded, the ESP8266 module must be in firmware download mode. This is done by connecting GPIOØ pin to ground (GND).


Get ESP8266 module info


Once the module is in download mode, powered up and connected to a computer:

  • Check the correct COM port is selected in ESP FLASH TOOL. The default Baud rate should work. In case it doesn't try different values.
  • Click the START button.

The program should display SYNC in a green square left of the start button. It will retrieve the MAC address, memory size and crystal frequency, among other info. .


Select and upload firmware files


Now that we know the ESP flash download tool is communicating with our module:

ESP FLASH DOWNLOAD TOOL V2.4

  • Select the correct flash memory size and crystal frequency. Note: sometimes the program retrieves a wrong crystal frequency (24Mhz or 21Mhz for example).

Now, depending on the firmware we want to use, we need to select one or more files in the ESP Flash Download Tool Download Path Config panel. Each of these files must be loaded to the correct memory address. This information should be in a Readme file in the firmware archive file.

  • For each file needed, click the ... button of the correct memory address and navigate to the .bin file.
  • Check the selection box of each file/memory address.
  • Press START.

After a few seconds, if the upload was successful, the ESP Flash Download Tool will display FINISH.

Now that we successfully updated the firmware we must not forget to disable the firmware download mode by disconnecting the GPIOØ pin from ground!

In RealTerm, sending the AT+GMR command will show the new firmware info: 

Verifying firmware update success in RealTerm

Be aware that the firmware upgrade might change the ESP8266 baud rate. In this case you must change the baud rate in RealTerm also!

I have uploaded a ESP8266 firmware upgrade video tutorial to YouTube. Please check it out and give it a thumbs up if you like it!


Downloads:
Download ESP FLASH DOWNLOAD TOOL
Download ESP8266 firmware
Download RealTerm

Buy the Parts:
Buy the ESP8266 Wi-Fi from Banggood
Buy the ESP8266 Wi-Fi from Dealextreme
Buy the USB to Serial Adapter from Banggood
Buy the USB to Serial Adapter from Dealextreme

Previous ESP8266 posts: 
ESP8266 ESP-01 testing - Part 2
ESP8266 ESP-01 testing - Part 1
ESP8266 WiFi modules

Saturday, May 28, 2016

ESP8266 ESP-01 testing - Part 2

Today we are going to learn how to communicate with the ESP8266 module through the serial (UART) connection using AT commands. 

In the previous post we learned how to connect the ESP8266 to a computer and test the serial and WIFI connection. If you need help hooking up your ESP8266 module take a look here: ESP8266 ESP-01 testing - Part 1

AT commands

Serial communication with the ESP8266 is done using AT commands. If you are not familiar with AT commands, they are instructions used to control modems. The ESP8266 is controlled the same way as a modem or GPS module. An instruction (or command) request is sent to the device to perform an action that once evaluated is executed (or not) and a "response" is given in return. The ESP8266 accepts many AT commands but today we are only going to use some of the most common ones. A full list of ESP8266 AT commands is provided at the end of this post.

The board used in this tutorial uses the stock firmware version .9.0.2 (00180008902) from AI-Tinker.com. Different firmware versions may behave differently. The AT commands list has also been updated since these boards where launched. If you are using a board with older firmware version and/or older AT commands version, newer AT commands will not be recognized! Like with firmware, the ESP8266 board AT list can be updated.

Let's get started!


Test AT startup


The first command we are going to send to the ESP8266 board is simply AT. It's used to test the startup function of our ESP8266 module. In RealTerm:
  1. Click the Send tab.
  2. Type AT in the first textbox.
  3. Check the  +CR and +LF.
  4. Press the Send ASCII button.

The ESP8266 board should respond with an OK message. This tells us the command was received and the serial communication is ready and working.

ESP8266 AT command

View version information


Now lets find out what is the firmware version of our ESP8266 board. Send the AT+GMR command.


This board uses firmware version .9.0.2 (00180008902). This is an old firmware version.

Note: the version information displayed depends on the firmware running on the board. Newer firmware versions display the firmware version and the AT commands version.
 

Change baud rate


Lets change the ESP8266 baud rate, or the speed of the serial communication. Let's try 115200 baud. Type AT+CIOBAUD=155200 and press the Send ASCII button. The ESP8266 should output the following text which confirms the new baud rate was accepted:

ESP8266 baud rate AT+CIOBAUD command

Notes:
Newer boards accept two sets of serial parameters: AT+UART_DEF (default params, saved on the board memory) and AT+UART_CUR (current params, not saved).

Now the ESP8266 serial interface is running at 115200 baud. Since we changed the baud rate in the ESP8266 module we must also change the baud rate in RealTerm to 155200!

ESP8266 baud rate AT+CIOBAUD command

The new baud rate was set and stored in the ESP8266 memory. From now on, every time the board is started or restarted it will default to 115200 baud rate. 

We can also ask our ESP8266 module what the baud rate is. To do this we send the command AT+CIOBAUD?  

ESP8266 baud rate AT+CIOBAUD? command

Other AT commands you might want to test:

AT+RST – Restart module;
AT+RESTORE – Factory reset.


Wi-Fi related AT commands


Before trying out WiFi commands we should get familiar with the different WiFi modes. As we know, the ESP8266 supports three modes: station mode, softAP (virtual access point) mode and station mode + softAP mode. In station mode the ESP8266 works as a network device and can connect to an existing wireless network (router). In softAP mode the ESP8266 behaves as a wireless router and can be connected to by network devices.When operating in both modes (softAP + station mode), the ESP8266 can act as network repeater.

Set WiFi mode


The default ESP8266 WiFi mode is softAP (2). To know what mode your ESP8266 module is in, send the command AT+CWMODE?

According to what WiFi mode the ESP8266 is on it will respond with 1 : station mode, 2 : softAP mode or 3 : softAP + station mode.


To set to a particular WiFi mode send AT+CWMODE=X, where X is the mode you want to set.

To use the next WiFi commands the ESP8266 must be in mode 1 or mode 3, so change to station mode (mode 1), sending  AT+CWMODE=1.

ESP8266 set WiFi mode AT+CWMODE command

Note:
AT+CWMODE will not be recognized by boards with firmware from Espressif, use AT+CWMODE_CUR or AT+CWMODE_DEF instead.

Get list of available WiFi access points in our location


Type and send the command AT+CWLAP. The  ESP8266 will scan the WiFi frequency range and list all the access points in range. Each line item consists of the security level of the AP, network name, signal strength, MAC address and WiFi channel.

ESP8266 get list of WiFi AP's AT+CWLAP command

Security Modes:
0 Open
1 WEP
2 WPA_PSK
3 WPA2_PSK
4 WPA_WPA2_PSK

Note:
If the you get an AT+CWLAP ERROR set the ESP8266 to station mode or softAP + station mode.

Join access point


To join an access point we can use the command AT+CWJAP="SSID","Password".SSID is the

ESP8266 join AP AT+CWJAP command

After a few seconds the ESP8266 should respond with OK if successful or FAIL if unsuccessful. After the board joins an access point, it will store that AP SSID and password and automatically join that access point every time the board starts up! To stop this, simply disconnect from the AP before powering of the board.

Note:
This command has been deprecated. If your board uses firmware from Espressif use AT+CWJAP_CUR or AT+CWJAP_DEF instead. See the Espressif ESP8266 AT commands list for details.

Disconnect from AP


To disconnect our ESP8266 from an access point simply send the AT+CWQAP command.


Documentation and tools:
Download RealTerm here.
Download AI-Thinker AT commands list here (unofficial).
Download Espressif ESP8266 AT commands list here.

Buy the Parts:
Buy the ESP8266 Wi-Fi from Banggood
Buy the ESP8266 Wi-Fi from Dealextreme
Buy the USB to Serial Adapter from Banggood
Buy the USB to Serial Adapter from Dealextreme

NEXT: ESP8266 firmware update
PREVIOUS: ESP8266 ESP-01 testing - Part 1

Saturday, May 21, 2016

ESP8266 ESP-01 testing - Part 1

In this post I'm going to test the ESP8266 ESP-01 WIFI module. I will demonstrate how to perform simple tests of the WIFI signal and serial communications with the module. This enables you to quickly check if  a board is good or faulty.

The previous post was and introduction to the ESP8266 WIFI modules family. If you missed it, you can read it here: ESP8266 WIFI modules.

Let's get started!


The ESP8266 ESP-01:

ESP8266 ESP-01 WIFI module

This module has inbuilt pcb antenna, 2 GPIO ports and pin header for external connections. Signal range is up to 400 meters (in open range). The board measures 14.3mm x 24.8mm. Prices start at around 2 USD for a ESP-01 with 4Mbit RAM memory (8Mbit RAM is also available).

The ESP-01 module used for testing is made by AI-Thinker.com, but the testing procedures are identical for boards from other vendors.

Testing the ESP8266:

When you buy one of these WIFI marvels you will want to perform a quick test to see if you received a good working device. 

Testing the WIFI

The simplest test is to power the module and check if its WIFI signal is detected. 
Connect the ESP-01 to a 3.3 Volts power source (GND and VCC pins). The module draws up to 170 mA when transmitting, so any power source capable of 170 mA will do the job.

ESP8266 pinout

 
WARNING: The ESP8266 power supply (Vcc) requires 3.0v to 3.6v. Never connect it to 5 Volts! 


ESP8266 WIFI connection test

After a few seconds your ESP8266 module should be listed as ESP_XXXXXX.

Testing the serial connection

Now we are going to test the wired serial communication between the ESP8266 and your computer. To do this we need to to connect the ESP8266 ESP-01 to a computer using the serial connection (UART) and a USB to serial adapter.

USB to TTL RS232 serial adapter
Connect the USB to serial adapter to the computer and check that it is recognized by the O.S. If you are connecting the adapter to the computer for the first time, you may need to install drivers. After the adapter connects successfully, disconnect it from the computer.

Checking USB to serial adapter COM port in Device Manager

Since the ESP-01 board communicates using 3.3 volt logic levels and not the more common 5V most adapters use, we will also be using a logic level converter. If your serial to USB adapter supports 3.3v logic level then you do not need the level converter (or level shifter). Do not confuse UART logic level voltage with power supply voltage!

4bit level converter board


Connect the USB to serial adapter, level adapter and ESP8266 module as follows:

ESP8266 USB to serial adapter level converter test connections

Most USB to serial adapters either have a jumper to set the power supply line (VCC) to 5V or 3.3V or have separate 5V and 3.3V VCC pins. Some level converters also have a 5V to 3.3V voltage converter. You can set the power to 3.3V in USB to serial adapter and connect it to the ESP8266 module or, you can connect the 5V Vcc output from the serial to USB adapter to the 5V Vcc of the level converter and connect the 3.3V output of the level converter board to the VCC pin of the ESP8266.

Please note that it IS possible to successfully connect the ESP-01 to the serial to USB adapter without the level converter/shifter, but doing so may cause unreliable operation or damage the ESP8266 board!

And this is how it may look after the connections are made. The small breadboard is not essential but, since we need to connect the ESP8266 CH_PD pin to a high logic level (3.3V), it is very handy.

ESP8266 serial test connections


To "talk" to the module we can use several serial communication / terminal programs or even the Arduino IDE. I will demonstrate using RealTerm. Realterm is free and can be downloaded from sourceforge.

After installing RealTerm, double check the boards connections and connect the serial to USB adapter to your computer. The red led (power) on the ESP8266 board should light up. The blue led should blink briefly. If the leds don't light up, unplug the USB to serial adapter from the computer immediately and check the connections again.

In the RealTerm Port tab, check if the correct port is selected. You can check this in the O.S. device manager COM ports. Make sure that byte size, parity and flow control are the same as the following image.


Disconnect and reconnect the CH_PD connection, preferably in the breadboard. Some readable text, like vendor name and firmware version should be displayed. 


If only garbled text is displayed it means RealTerm is not communicating correctly with the module. This probably caused by a speed mismatch. Select a different baud rate, press the Change button and disconnect and reconnect the CH_PD again. Repeat this until some legible text is displayed. Most modules seem to come with a default baud rate of 9600, so you may want to try 9600 baud first. 


That's it for now! Next time we will learn how to send commands to the ESP8266 module and, amongst other things, change the baud rate (speed) of our board. 

Documentation and tools:
Download RealTerm here.
Download ESP8266 datasheet here.
Further ESP8266 information, documentation and tools available on the Espressif Systems site. 
List of ESP8266 modules and specifications of  ESP8266 modules from AI-Thinker (not full list) can be downloaded here.

Buy the Parts:
Buy the ESP8266 Wi-Fi from Banggood
Buy the ESP8266 Wi-Fi from Dealextreme
Buy the USB to Serial Adapter from Banggood
Buy the USB to Serial Adapter from Dealextreme

NEXT: ESP8266 ESP-01 testing - Part 2
PREVIOUS: ESP8266 WiFi modules