Today we are going make a remote Wi-Fi Internet connected temperature data logger using an ESP8266 WiFi module and a DS18B20 temperature sensor. The temperature readings will be automatically published at ThingSpeak.com and can be accessed from anywhere on Earth with Internet access. This is an easy and inexpensive project that almost anyone can successfully accomplish!
Hardware needed:
ESP8266 ESP-01 module (other ESP8266 modules can also be used).
DS18B20 temperature sensor.
1 4.7K 1/8w resistor.
Breadboard.
Breadboard wires.
Power supply (3.0 - 3.6 Volt).
The DS18B20 temperature sensor uses the 1-Wire bus that (as the name implies) requires only one data line for communication with a micro-controller. As you may recall from previous posts, the ESP8266 ESP-01 has 2 GPIO (General purpose In/Out ) ports and can be programmed to be used as a stand-alone device. So, to build a Wi-Fi one sensor temperature logger all we need is a ESP8266 module, a temperature sensor, one resistor and a power source. If we needed added functionality, for example also displaying the temperature reading in an LCD, then we would not use a stand-alone ESP8266, but we would connect it to an microcontroller board (like an Arduino). More advanced users could easily build a bare bones board with a microcontroller and a few discrete components.
The breadboard is not essential, just convenient for testing purposes. After all testing is done we would solder all the components together for minimum footprint.
For power source we have many options. We will choose a suitable power source based on where the sensor and module will be located and the autonomy needed. For testing purposes we can use a USB 5V to 3.3V voltage converter or two 1.5V fresh batteries in series. As long as it can deliver between 3V and 3.6V and 170mA, it will do.
The DS18B20 can be powered in two ways: external supply or parasite supply. Parasite power supply mode can be very useful if the sensor will be located far away from the Wi-Fi module. In parasite power mode the sensor gets its power from the sensor data line. There are caveats however, so read the DS18B20 datasheet carefully. In this circuit I will be using use a "normal" external power supply.
For the ESP8266 to work as a stand-alone device we need to use a module with bootable OS. For this project we will use the NodeMCU firmware, based in the eLua programming language. NodeMCU firmware can be obtained from GitHub. You can buy a ESP8266 module with NodeMCU already loaded or you can flash a "standard" ESP8266 with the NodeMCU firmware yourself. If you're like me you'll want to flash the firmware yourself. After all that's how we learn, by doing it ourselves!
If you don't know how to upload NodeMCU firmware to the ESP8266, please read my previous post.
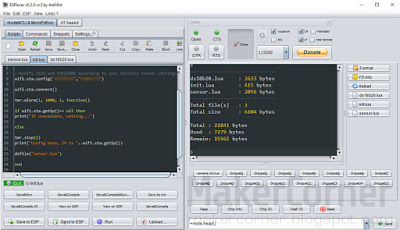
After successfully flashing the ESP8266 with NodeMCU we will need to upload three additional files to the module: sensor.lua, ds18b20.lua and init.lua. Reading of sensor data is done by sensor.lua and ds18b20.lua.
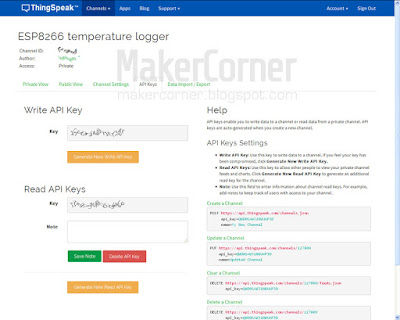
To publish the temperature sensor data on ThingSpeak.com you must first create an account with ThingSpeak and get an API key. After you create your account, click on the API keys tab to get them.
Copy the API write key and edit sensor.lua to add the key. Temperature reading interval set in sensor.lua and take place once a minute, but this can be changed. Init.lua should be the last file uploaded and, before you upload it, you must edit the file to add your Wi-Fi login information.
To upload the .lua files we can use ESPlorer or LuaLoader programs. In this example I'm using ESPlorer:
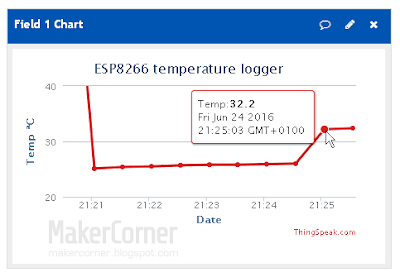
If all is OK, after the files are uploaded temperature readings will start and will be published on your ThingSpeak.com channel:
Congratulations! You now have an Internet connected temperature data logger!
Downloads:
DS18B20 datasheet
ESPlorer program
Lua files (sensor.lua, ds18b20.lua, init.lua)
Buy the parts and support MakerCorner!
I buy most of my electronics, tools and measuring equipment from Dealextreme and Banggood in China. They have low prices, friendly and helpful staff and will offer a solution if something goes wrong with your order. They have warehouses in Europe and the USA and can provide faster delivery for many of the items. I get a small fee if you buy from them through links in MakerCorner. So, please support my work by clicking on the following links. Thank you!
I buy most of my electronics, tools and measuring equipment from Dealextreme and Banggood in China. They have low prices, friendly and helpful staff and will offer a solution if something goes wrong with your order. They have warehouses in Europe and the USA and can provide faster delivery for many of the items. I get a small fee if you buy from them through links in MakerCorner. So, please support my work by clicking on the following links. Thank you!
All parts are available in DX and Banggood, just click on the links and search for the part name on the web site.
Buy the parts from Dealextreme
Buy the parts from Banggood
Previous ESP8266 posts:
ESP8266 NodeMCU firmware update
ESP8266 firmware update
ESP8266 ESP-01 testing - Part 2
ESP8266 ESP-01 testing - Part 1
ESP8266 WiFi modules


No comments:
Post a Comment